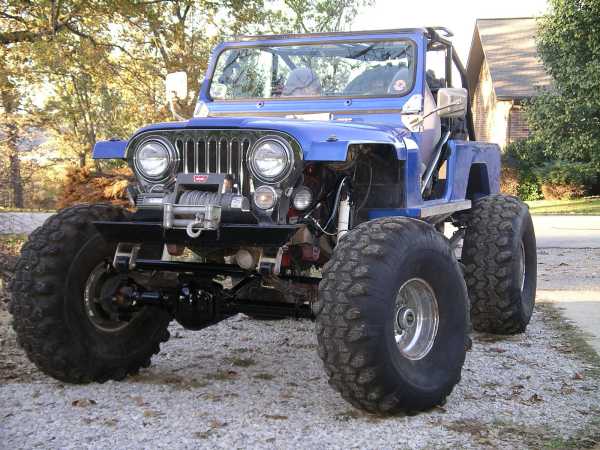
My 1983 Jeep Scrambler CJ-8
My RigRater Score: 1027RRv1.0 with a BOA of 27.36 degrees!
|
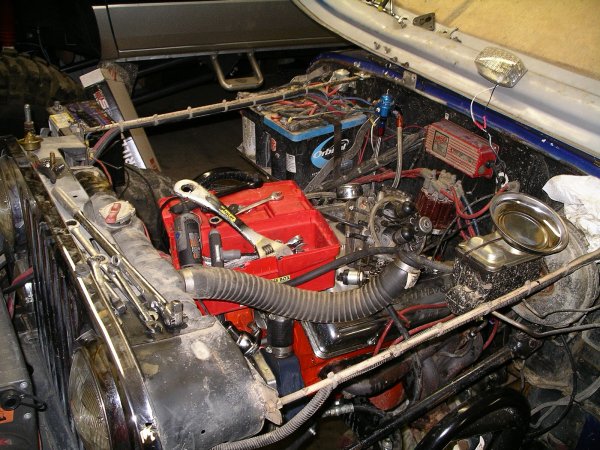
After having Scramzilla for a few months and trying to wheel with the Holley Pro Jection fuel injection system, it was apparent that I was not going to be happy with this system. My problems were that the Jeep was getting way too much fuel at an idle, but not enough once I gave it a little gas, and if I went above 3,000 RPM, it would hesitate, then backfire. I tried using an AEM adjustable fuel pressure regulator, thinking that I might be able to crank up the Holley regulator where it would provide enough fuel at a higher RPM, and the AEM would limit the fuel delivery at low RPM's, but it didn't work good enough. I was still blowing black smoke at low RPM's and the engine did not perform at all. I finally realized I was either going to have to keep pouring money into the Holley system, or bite the bullet and upgrade. A buddy of mine just happened to have an old Tuned Port Injection system off of an old Iroc Camaro that he wanted to sell so he could stroke the LT1 in his buggy. Since my motor was from an '84 model pickup, I had to make sure that the TPI intake would fit on my block. We had no idea what car the TPI had come off of so it was just a guessing game. I found out that the intake would bolt up with no modification, so I bought the entire box of parts from him and started sorting things out. It was a complete setup, which had the intake, plenum and throttle body, runners, fuel rail, fuel regulator, thermostat housing, distributor, ECM, sensors, and the wiring harness. This was a mass air flow sensor setup, and came with an aftermarket MAF sensor, but no air filter. I also got a set of headers with the setup. Good deal! After taking everything out of the dusty
old box and examining everything, I was able to make a list of what I needed to
get the system up to par and ready to bolt into my Jeep. Or so I
thought. I spent the next several months staring at the wiring harness on
my floor and figuring out where everything went. It became apparent that
several connectors were missing or not useable. I decided that instead of
trying to make a 20 year old loom full of wires work, I would save up for the
Painless Wiring harness kit. I also needed new fuel injectors.
Remember, this came off of a pre-87 car, which meant it was almost 20 years old
at this point. At that time, all Irocs had the 305 V8, and I was putting
this on my 350, so I had a need for larger injectors anyway. The stock
ones, I After chatting with a very knowledgeable guy on thirdgen.org's board, I proceeded to learn more about TPI than I ever thought I would need to know. We discussed what the pros and cons were of mass air flow vs. speed density, and I came to realize that speed density would be a much better setup for me because it would be more reliable under inclement conditions that the Jeep goes through constantly. Remember, this thing is a trail rig only, I do not drive it on the street at all. My biggest concern for this system is reliability. By going to speed density, I would be able to eliminate the very expensive and very susceptible mass air flow sensor, and then I could mount my air filter right on the throttle body, therefore I would have a better chance of not getting water in it. My Jeep has no fenders so mounting on the throttle body is the best location possible. However, to switch to speed density, I would need a couple new sensors, a new ECM, and would have to cut up my pretty new Painless Wiring harness. Screw that! I sent the harness back and got one for a 90 model, bought a new ECM off of Ebay for a few bucks, and picked up the new sensors. So now I am ready to go with a speed density TPI on the Jeep. Time to install! First, I had to remove the old Holley system. I removed the computer from inside the dash, pulled out the harness that was connected to it, and then removed the intake and throttle body. Damn, that was easy... a little "TOO" easy if you know what I mean.
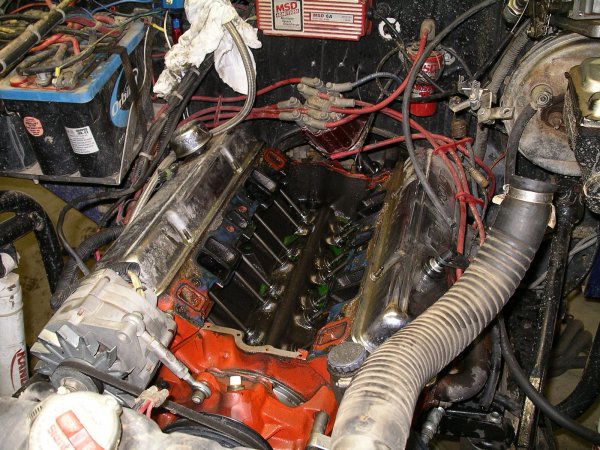
So the old stuff was removed and out of the way. The first thing I did was get a roll of paper towels and cover up the heads and ports real good, then I got out my razor scraper and start scraping off all of the old gasket material. I get everything I can with a razor, then come back with a scotch brite pad (those green things you use to clean tile or whatever) or steel wool (if I have some and can take it from the kitchen without getting caught) and get the little parts. I also found that using a small sandpaper bit on my Dremel tool works extremely well. After getting all of the old stuff off, I put the Fel Pro gaskets on for the intake. I got an entire TPI Fel Pro gasket set off Ebay for like $40, which is great because it came with a whole bunch of stuff I didn't need and a few things I did need were not included. So I really feel like I got my money's worth there. At least it came with some cool little black gaskets that fit on the front and rear part of the heads so you don't have to use any gasket maker material. I always keep a can of "The Right Stuff" handy in case, and actually I would be lying if I said I didn't use a little in the corners to make sure I had a complete seal. Also, the area on these intakes that are most prone to leak are the water jackets, so they can usually use a little of The Right Stuff as well. No other gasket material has the Danny Gaston seal of approval. I bolted up the new intake, bolted on the thermostat housing that was from the old intake, put the distributor back in back did not bolt it down, and called it quits for the night. As I was walking away, I noticed a vacuum hose that had gotten dangled up behind the intake. I tried to grab it and pull it out of the way, but it was caught on something... oh man, I bolted it down under the back of the freaking intake! I had about a foot of rubber vacuum hose stuck under the intake, and after having compressed the gaskets already, I couldn't just unbolt it and yank that out and then bolt it back down. So I had to get new gaskets from O'Reillys the next day, remove the intake again, and reinstall the intake with new gaskets. This time I made sure there was nothing in the way. I did, however, pull on the distributor a little too hard and caused one of the spark plug wires to come out of it's boot. I want to do this perfect, so I will be buying a whole new set of MSD Super Conducter 8.5mm wires now, since you cannot buy one by itself.
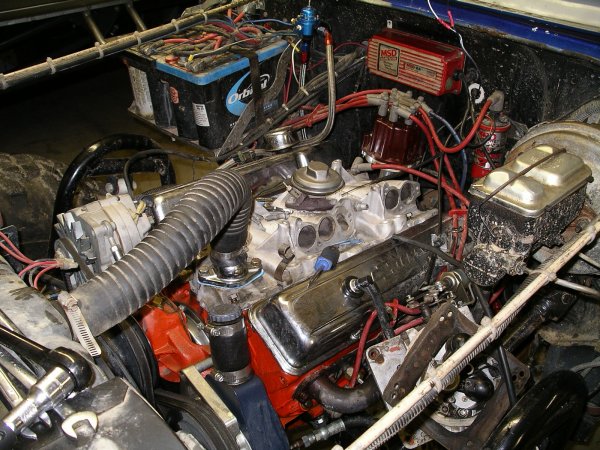
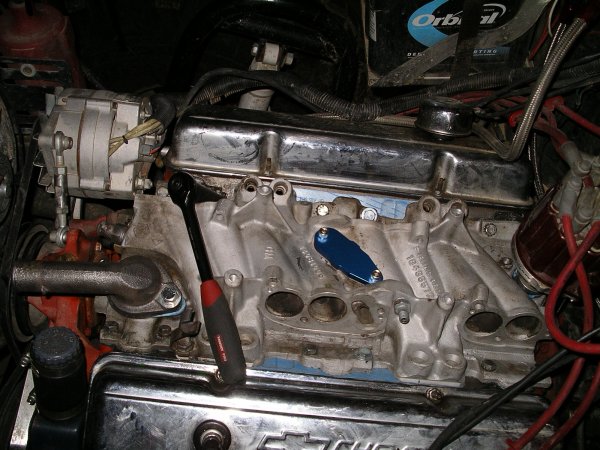
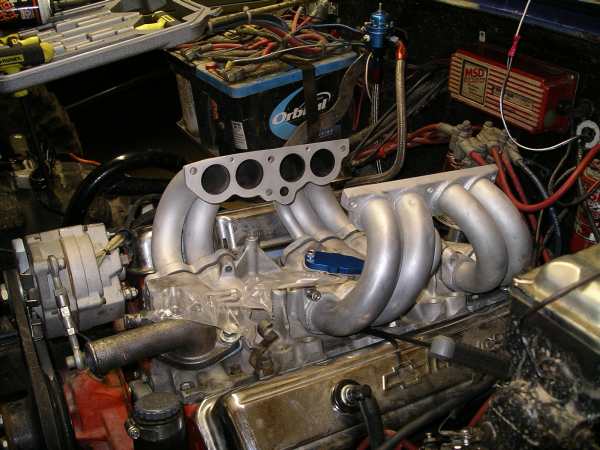
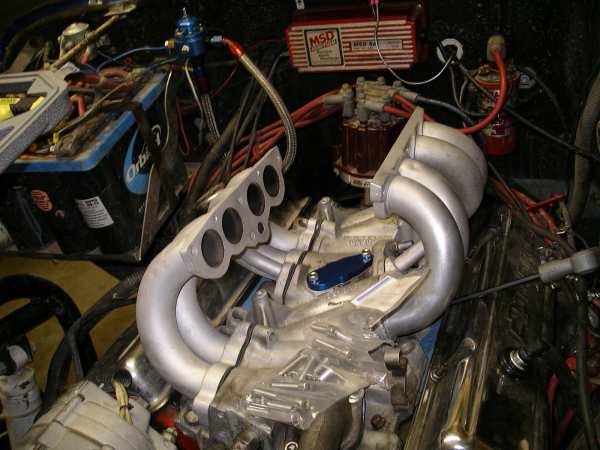
Now that the intake was bolted on correctly with no problems, I went to mock up how the plenum and runners and fuel rail would sit on the intake so I could see if I had enough clearance everywhere or would need to modify anything. It turns out that the ugly thermostat housing that came with this TPI setup has to replace my sweet stainless steel housing because the plenum and coolant hose get in the way of each other. So I just wasted another Fel Pro gasket, and had to go get a new one. In the process of bolting up the new housing, I over tightened the rear bolt and it snapped off inside the bolt hole. I was able to get it out with an extractor and then tap the hole and reuse it, but that cost me about an hour by the time it was all said and done. So don't over tighten stuff! More is not always better! After that was done, I couldn't get my coolant hose to bend enough to get on the new housing shaft, so I had to get another coolant hose from the parts store. Then it was on to the MSD Pro Billet distributor. I couldn't get it to seat down in the motor all the way, so after I hooked up the fuel line to something, I was able to just bump the ignition and the distributor sat right down where it needed to be. Then I used the stainless hold down and bolt to secure it into place. I bought an entire stainless steel allen head bolt set off of Ebay. Since I was not sure what bolts came with the kit and what I would need to get, I just got the entire kit, that way I didn't have to do any bolt hunting at the hardware store. Conveniently, the bolts I bought were all individually labeled, which made me happy. While waiting for some more gaskets I purchased to come in, I got a blue billet EGR blockoff plate for the intake and bolted it up. I got it for $15 on Ebay and it came with stainless bolts and a gasket. It was a rewarding experience for me because it was finally something that absolutely could not go wrong. Here is the plate installed, and you can see the ugly thermostat housing installed.
The next day, I received several packages in the mail I had been waiting for. One was the upper TPI gaskets for the runners, the other was my new 21 lb.hr Accel fuel injectors, and the other was my new Bosch single wire O2 sensor. So I made yet another trip to O'Reilly's to get a few odds and ends I needed... the new throttle cable, a MAP sensor, and a knock sensor. I bought a coolant hose for an 86 Iroc but it's three times longer than it needs to be and none of the bends line up correctly, so it has to be returned for a different one. I came back home to at least get the runners mounted up, and accomplished that very quickly. The gaskets I got were really cool because they snapped into place in some small holes in the intake. Here are a couple of pictures of the runners in place. They are not completely bolted down yet at this point but now I can start to see how everything is going to sit. I did keep the runners a little loose until it was time to bolt the plenum on, that way it's easier to get everything lined up.
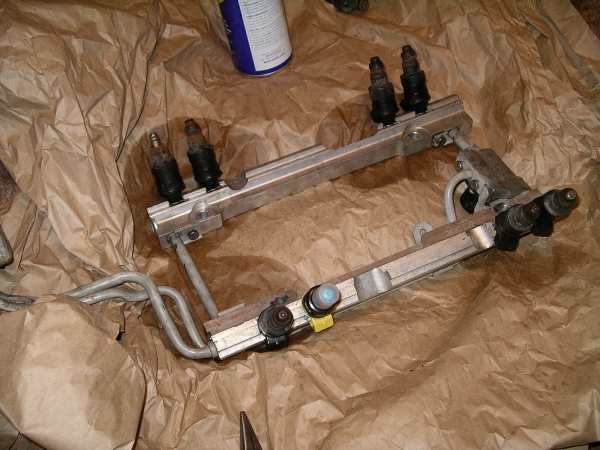
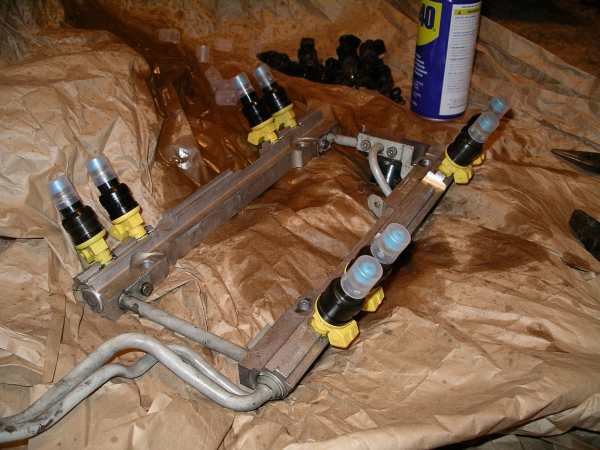
The next step was to put my new Accel fuel injectors in the fuel rail and get it bolted up. The old fuel injectors were beat up, missing pieces, and just plain nasty. Plus, they are 19 lb.hr injectors and I needed a 21 or 22 lb. injector. Accel makes some of the best injectors you can get; I got mine from Summit Racing. The job of swapping injectors is very easy. First, I sprayed everything down with WD-40. Then all you have to do is move these little locking tabs so they allow the injector to be removed, then I just used a big pair of pliers to grab ahold of each injectors and wiggle it around until it came out. The only thing I had to salvage from each injector was the locking ring, as the Accel injectors came with new O rings and everything. All you have to do is put the clip ring on the injector (it has to go on the upper most full circumference circle so that the injector will sit down in the intake all the way), spray some WD-40 or any type of lubricant or oil on the O rings, and slide the injectors in. It's a very easy job. Here are a couple of pictures of that process.
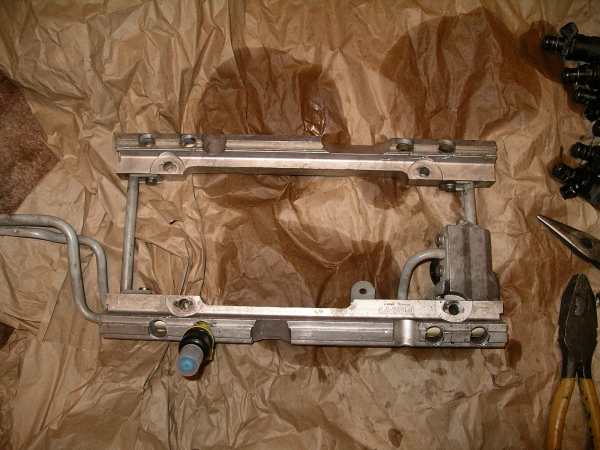
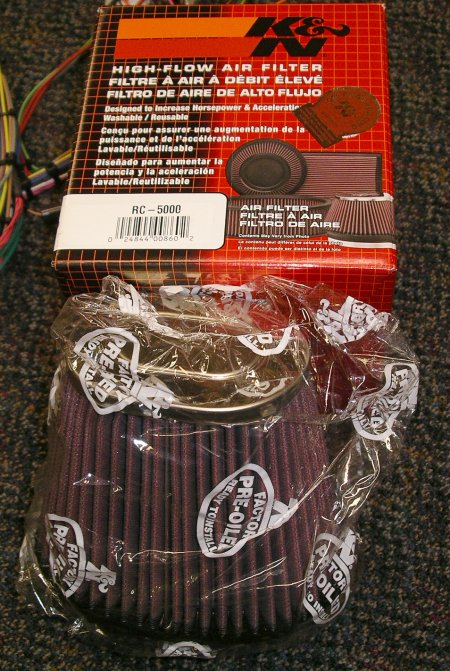
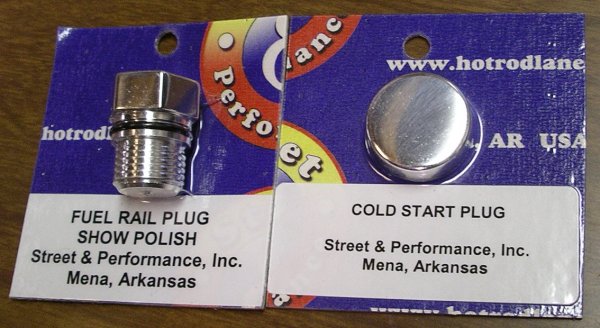
After putting the injectors in, I could have bolted the fuel rail up and hooked up the fuel lines, but the lines for the fuel rail are up at the front of the block instead of the rear for some crazy reason. I already have braided stainless fuel line with top of the line fittings and hate to change that up. So I sent my fuel rail to Street and Performance down in Mena, Arkansas. They can modify your fuel rail for you or you can order their kit and do it yourself. While I was at it, I ordered a plug for the 9th fuel injector my TPI has. The 9th injector was used for cold starts from 85 to 88, then somebody finally figured out that instead of using an extra injector for priming, they could just make the regular 8 injectors prime the motor for cold starts. So the 9th injector was done away with after a couple of years, but lucky me, I got a TPI system with one. Basically you have an extra injector on the driver's side of the intake and then you have a hole on the back of the fuel rail to screw your fuel line for that injector into. You need a cap for each one if you upgrade to a newer ECM and don't utilize the 9th injector. At this point, I am sitting here with 95% of everything I need, but I am still lacking a few key items. I had received my Painless Wiring harness and sent it back for a different harness, one that would plug into my 90 model ECM. I also needed an air filter, and since I was ditching the MAF and going to speed density, I could just get a K&N model RC5000 filter and mount it directly onto the throttle body.
After laying out the harness and seeing what all the wires went to, I realized that I did not need a lot of them. So this harness is more than complete, it's got several wires that I will just be securing out of the way. I do really appreciate how each wire has a tag on it that tells you exactly where it goes or what it connects to. Wiring up the fuel injection should be very easy. I also got a relay that would allow me to bypass the Vehicle Anti Theft system that is standard on later model TPI systems. This relay is from Painless Performance as well.
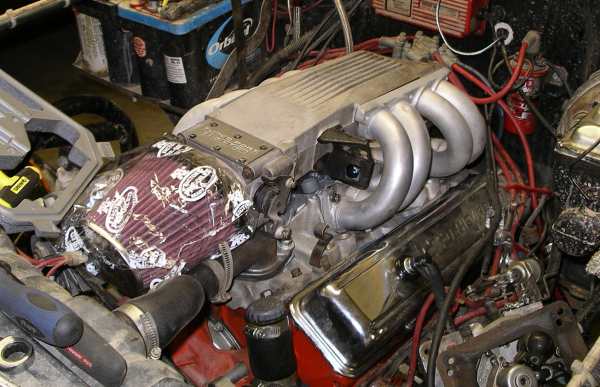
After getting the harness and filter, I was really anxious to see what it all would look like. So I went ahead and lowered the plenum down onto the runners and fit the filter up so that I could see what the clearances were going to be like and just how it would look in general. Of course, I took a photo.
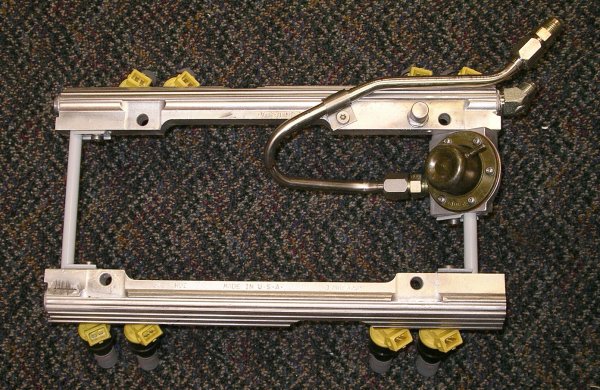
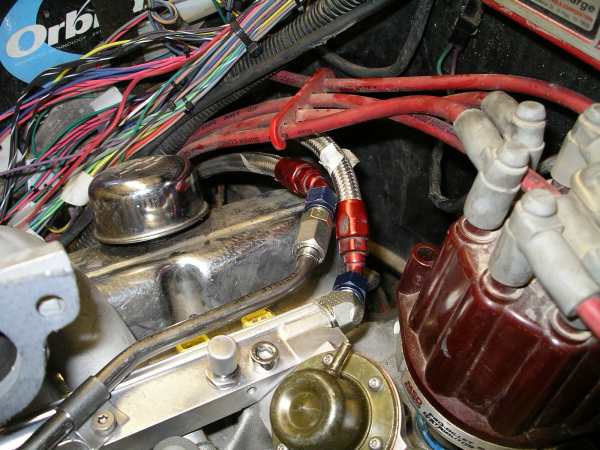
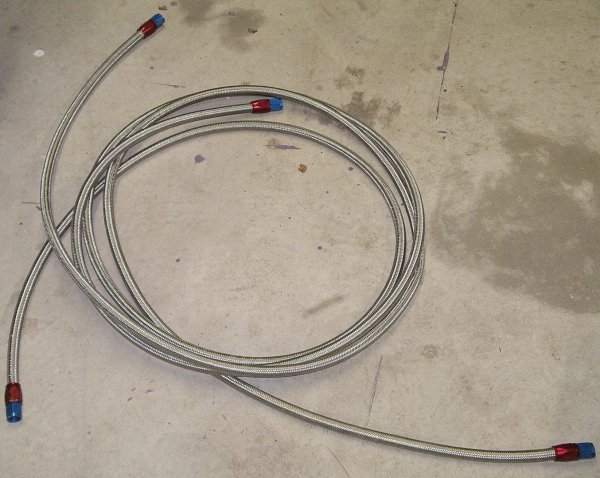
Okay, after only a couple days of waiting, my fuel rail came back from Street and Performance as well as the 9th injector plug and plug for the back of the fuel rail where the 9th injector line would go. Street and Performance was truly a pleasure to deal with, and since they are in my home state of Arkansas and only a few hours away, I can get anything from them within a day. Anyway, the lines were modified so that they came in on the rear of the fuel rail, passenger side, instead of the front. Now I can hook up my fuel lines without having to extend them. I already had stainless steel braided lines and did not want to use new ones. Also, Street and Performance used fittings that are AN-6 on the end so that the fuel lines really do just bolt right up right out of the box.
So the first thing I did after work was go home and install the fuel rail! I had to remove one of the runners because the fuel rail would not fit down in there, which is no big deal. I had to put the fuel injectors into the rail using the last ring so that the injectors would sit down in the ports all the way. Accel injectors are a little shorter than stock GM injectors, but they do fit and instruct you on how to install the clips so that everything is sealed up. Of course, you always want to lube up the O rings before you slide the injectors in the ports, both on the intake and fuel rail. I just used WD 40 because it was conveniently within arms reach, but anything will work.
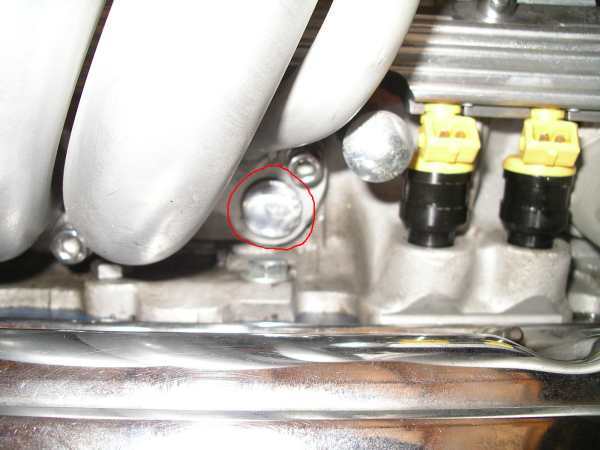
Here are the plugs I mentioned earlier from Street and Performance. The left plug goes into the end of the fuel rail where the line for the 9th injector would go. The right plug goes into the driver's side intake runner where the 9th injector would go. The both of these plugs together were only $15 and they are both polished, so it's a cheap way to add some bling to your fuel rail and driver's side runner.
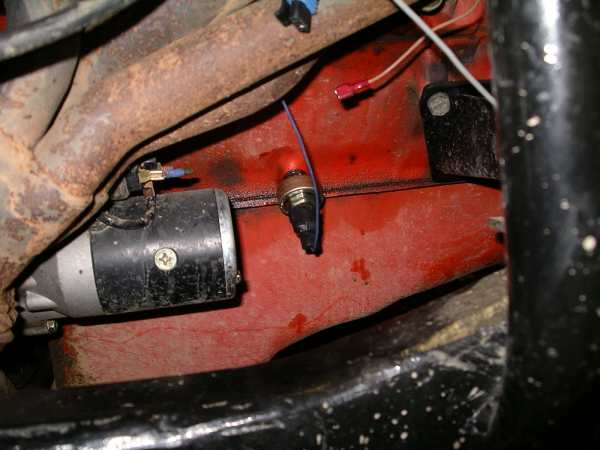
This is the location where a knock sensor goes. It's a drain bolt for the block, not to be mistaken for the heads. ;-) My block is from a 78-80 pickup and did not have a knock sensor, but all you have to do is take this drain bolt out and put the knock sensor right in there. I chose to put it in the passenger side because the wire from the harness would reach that side easier than the driver's side.
Then I went ahead and hooked up the fuel lines to the fuel rail. I had labeled each line before taking it off of the old fuel regulator so that I knew which one was the supply line and which one was the return line. Thanks to Street and Performance using AN-6 ends on the fuel rail, I was able to bolt the fuel lines right up.
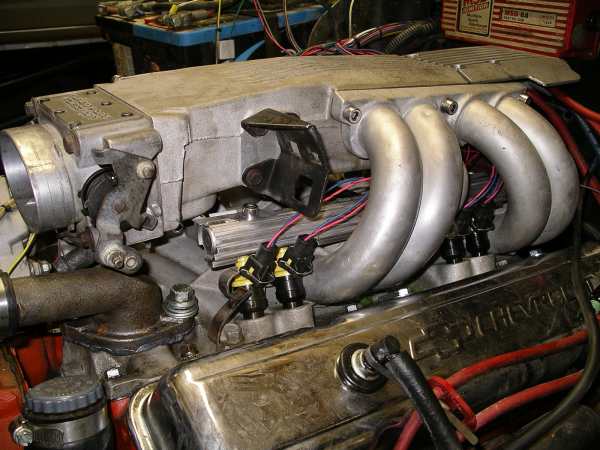
After that, I went ahead and installed the plenum. The thing to remember to do here is hook up your IAT sensor wire before you bolt down the plenum, otherwise you will never reach it. Then make sure the gaskets don't move around on you and bolt that sucker up. There are 5 or 6 bolts per side, some are hard to get to. Just be patient and use the right tools and it will go together fine. This picture also shows that I wired up my fuel injectors after putting the plenum in place.
Here is the Throttle Position Sensor hooked up, below that you see the IAC module installed, and to the right of it on the front of the intake, you can see the coolant temperature sensor is also installed and wired up. Before starting the vehicle up, you have to make sure that the TPS is getting half of a volt with the ignition in the start position.
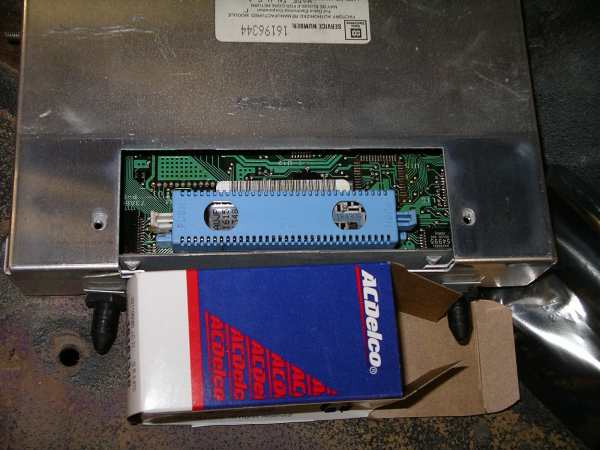
Finally, my AUJP memcal chip arrived! I ordered it from GMPartsDirect.com, which is a great site when you are a cheap bastard like me and want to save money, but man it took a while for this little thing to come in. I had it installed in about two minutes. The chip only fits in one way so you cannot install it backwards, no matter how hard you try. The AUJP chip is the most common and will be the best one for my application. It is for an automatic transmission, which I do not have, but everything else should work fine.
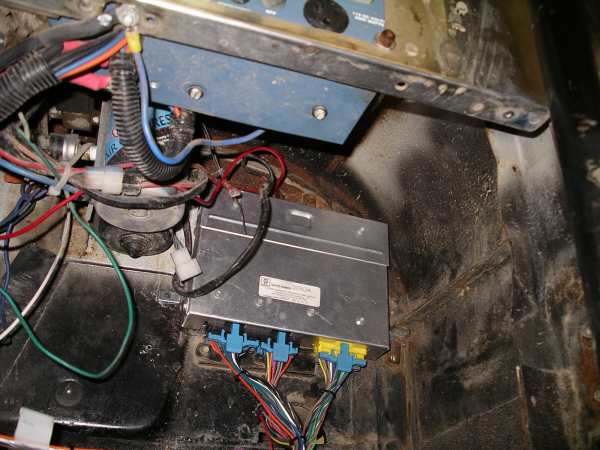
After putting the chip in, I put the cover back on the ECM and bolted it to the firewall up under the dash. I used some cheap little L brackets from the hardware store to secure it into place. I wanted it up as high as I could get it in case I ever get into some really deep water, plus it needs to be protected from rain and other elements.
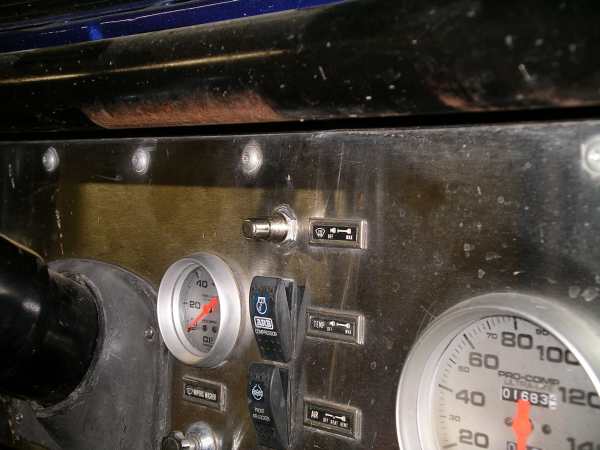
After months of putting it off, I finally installed my push button starter. I removed the stock defroster switch, which was not being used, drilled out the hole with a 5/8" drill bit, and this $7 part from Wal Mart went right in with a simple two wire hook up. One wire to the battery or a 12v power, and the other to the starter. My stock ignition switch had been giving me fits for a long time and I wanted something that would not get hung up. The starter switch goes great with my ARB switches and stainless dash and is very simple, which fits the rest of the rig very well.
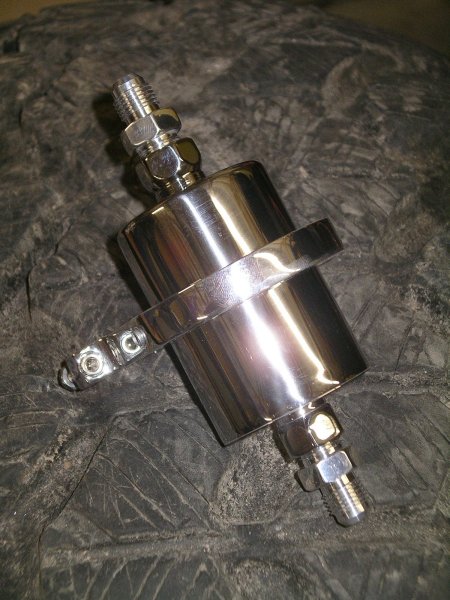
Then came the entourage of parts to finish up the project. These are the "little things" that snowball on you near the end of any project, as you start to realize exactly what you need to finish it up. I was lucky to be working with Street and Performance through so much of this and they really knew what I needed. I needed a new fuel pump that would run at a higher pressure than my previous pump, and while my old pump was externally mounted, I went with an internal pump so that the gas can keep it cool. Since I will be running higher fuel pressures, I needed to get rid of the old fuel line I had, which was patched up in many places with rubber fuel line and clamps. I went ahead and measured to see how much line I would need, gave the measurements to S&P, and they sent me pre-made stainless braided lines with fittings. I also got a new fuel filter with AN-6 fittings to match the new line. This would complete my fuel system for the most part. I had to do some fabrication to make the internal pump work with my old sending unit, but it was not hard. I didn't take any pictures of that because my hands were covered in gas, but really all you have to do is measure to see how deep your tank is from the top to bottom, then figure out where to mount your fuel pump and sock, and make it work. I was able to get the pump right on the bottom of the tank, about 1/4" off the bottom, and then I ran my wires for the pump out of the old return line fitting that I don't need to use. My tank has a fitting on the side of it for the return line to dump into, so that left an open port on top of the sending unit, perfect for two 16 gauge wires. Then I just wired up the fuel gauge wire and ground for both the pump and gauge sending unit, and bolted the tank back up. Pretty simple!
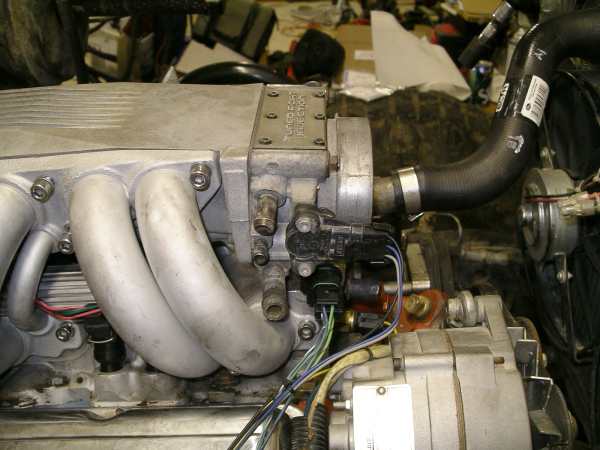
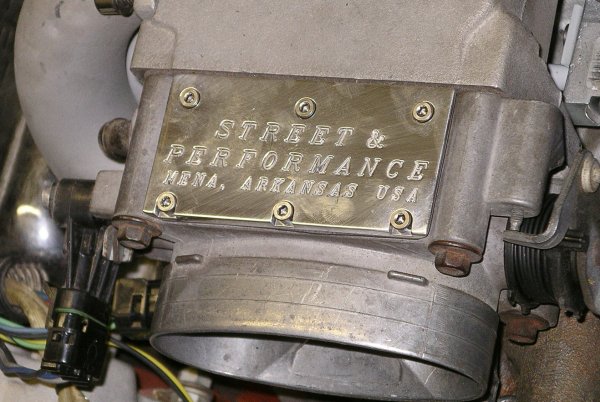
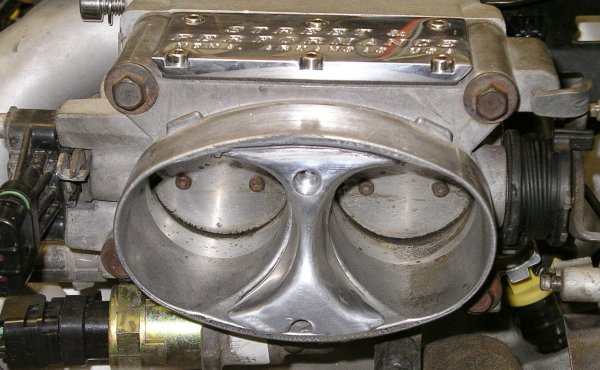
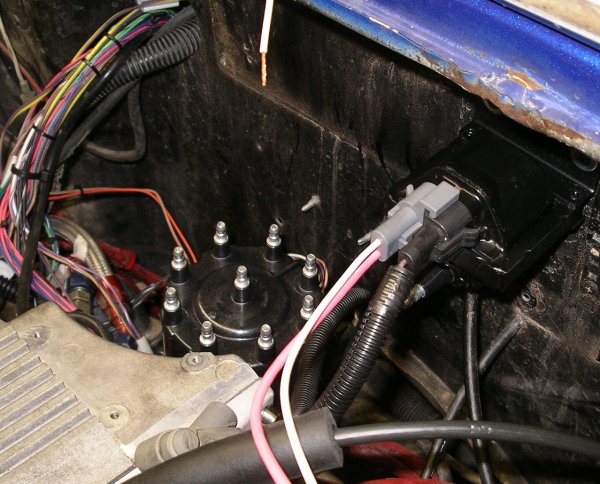
Now it's back to the engine compartment. Street and Performance sent me this free throttle body name plate, which is about 10 times nicer than the stock one I had, so I gladly put it on. I also got a chrome air foil to put in the throttle body to help smooth out the incoming air flow. Will it make a difference? I don't know, but for $40, I figured it was worth a shot. After messing with the throttle body, I put the new small HEI distributor in and mounted the remote coil on the firewall. The remote coil has two spots for harnesses to plug in. One harness goes to the distributor, and the other harness has two wires... one is for the switched power (start and run only), and the other goes to the tachometer. It seems like I have had to wire a lot of stuff up, but honestly, there aren't that many wires to be crimped and spliced. It's all very simple, especially when you order stuff that tells you exactly what to do.
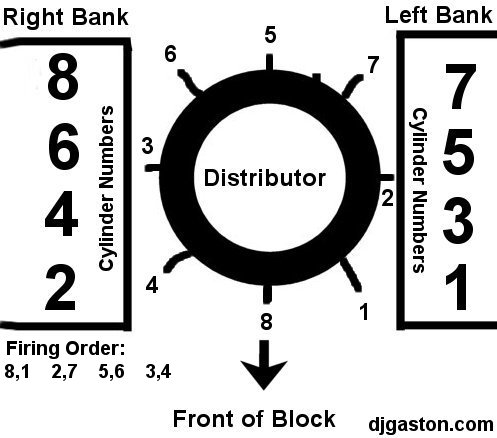
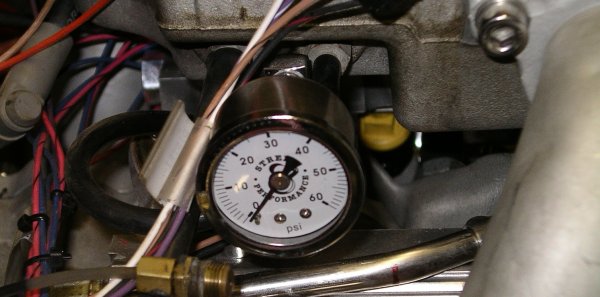
Okay, at this point, I am so close to being done that it's not even funny. I've been saying that for a few weeks though. But I'm serious this time. Really. ;-) Anyway, after getting all of the previous stuff done, all I had left was to mount the new fuel lines to the frame and hook them up to the fuel rail, and then hide all of my wires and put the interior back together. I also needed to mount the oil pressure switch so I could put the spark plug wires on the distributor and fire this baby up! I ran the fuel lines where the old lines went and secured them every 8 inches so that they would not move around very much and were routed away from any possible obstructions. After securing the fuel lines, I made sure everything was hooked up on the fuel tank and fuel pump and realized I had forgotten to run the positive wire for the fuel pump. So I ran that along the frame with the fuel lines and hooked up the fuel pump, and turned the key on to make sure it was working... it did. So I know that the Jeep is going to get fuel at the regulator for sure. With my new Street and Performance (I use their stuff a lot, don't I?) fuel pressure gauge, I can just glance at the fuel rail to see what kind of pressure I am running. It mounts right onto the valve that is on the passenger side of the rail. Of course, it's chrome too. The only thing left to do at this point is to mount the oil pressure switch, which is important because if it senses a significant drop in oil pressure, it kills the fuel pump and therefore causes the engine to stop running. Anyway, after I hook that up, I can put the distributor back in, clamp it down, and put the plug wires on. I had a hard time finding a wiring diagram of what the firing order is for the Chevy 350, so the tech guys at S&P sent me a drawing via fax. I, in turn, drew this in Paint Shop Pro and have it on here, hoping it will help somebody else. Now there is no reason to ever hook up the spark plug wires wrong if you have a 350 and have seen this page.
I have not updated this page in quite a while but the project has been ongoing since the last update. Since July of 05, I spent some time getting the Jeep together and running properly. I ran into some problems after the install was completed. I found out that I had a leaking head gasket and so I ended up having to tear the whole thing down. What makes this even more fun is that I didn't know about the head gasket until a week before the guys from Crawl Magazine were going to be here to do a feature photo shoot on the Jeep! I had to pull the heads off and have them taken to Hood Hi Performance in West Plains, Missouri where the heads were magna-fluxed for cracks and cleaned up. Once it was verified that the heads were fine, it all went back together. My friend Earl really helped me out a lot with all of this because I had no time to work on the Jeep and I don't know nearly as much as he does about putting motors together. Coming down to the final minutes before Brandon and John from Crawl Mag got here, the motor was thrown back together and was actually fired up for the first time as they arrived at my house. I still had to put the new headers on and have the exhaust welded up the next morning, but the Jeep ran great. I drove it from the house down to the resort to get Brandon and John and could tell instantly that this thing wanted to open up. It's just got a ton of power now. However, as my luck would have it, I ran into some pretty crazy problems over the following two days. Just as I started to crawl up some rock ledges for the cameras, the Jeep died. It ran fine on flat ground but it died when the nose went up in the air. I thought it was just low on fuel, but after pouring on 5 gallons of gas that I had to carry about a mile uphill (true story), the Jeep still would not start. The pump was not turning on. We messed with it as much as we could on the trail, but in the end, the pump was just dead and there was nothing we could do. I ran into town to get another intank pump so I could change it out. This worked and I just chalked it up as a bad fuel pump for one reason or another. So the next day, we loaded the Jeep on a trailer and took it to another location, about an hour away. I wheeled for 10 minutes or so, going down hill, over rocks, through trenches, etc. The first hill I came to, the pump died again. I still have not figured out exactly what is going on but it appears that the fuel pump smacks the back of the metal tank on inclines and either the pump grounds out or shuts off from the impact. The magazine guys left after getting enough photos for the publication but the Jeep was still not running and I was very disgusted at this point. I let it sit for a month or two and didn't even touch it. That was back in December. Sometime in February, I installed an external fuel pump and solved my problem of the pump turning off. When I did this, I created a new problem. The external pump has to mount up higher than the tank itself, so it takes a while for it to prime the first time I start it up. Ideally, it should be mounted lower than the tank, but this is not possible on my Jeep because the tank hangs down as low as the top of my rear axle! My best option at this point is to install a fuel check valve where the stainless braided line connects to the sending unit on top of the tank. At the time of this writing, I am pursuing this idea and will update later. Despite the priming issue, I took the Jeep out one time in January to try it out again. I had the hardest time getting it started and keeping it running. Low and behold, both of my batteries were not able to hold much of a charge, so I ordered up two new blue top Optima deep cycle batteries. I have not taken the Jeep out again since installing them but I have noticed that the motor idles much smoother now, and of course it fires up instantly. A friend did notice that my fuel pressure was a little lower than normal. I'm running about 38 to 40 psi and that really should be in the upper 40's. I simply ordered an adjustable fuel pressure regulator from Street and Performance and will be able to allow a little more fuel into the rail to build that pressure up. I'm using a fuel rail from a 305 V8 but I have injectors for a 350, so of course the pressure is not just where it needs to be without modification. So if the bugs are all worked out for now, what else is there to do once you install a TPI system? Well, one of the best things you can do is look into tuning your Engine Control Module (ECM) for the upgrades you have. I put an AUJP memcal in my ECM, which is made for a 350, automatic transmission TPI setup. I do not have an automatic transmission, so my Jeep is slow to come back down to idle when it revs up. I was fortunate enough to talk to a guy on Pirate4x4 named MrWillys who offered to help me get the ECM dialed in correctly. Anybody can do this in their own shop if you purchase the needed cables, chips, and software. MrWillys has all of this and a lot of experience with tuning TPI systems, so I asked him to take care of it for me, and he said he would. He is programming my chip for a standard transmission, tuning the computer for the cam and compression ratio I have, and much more. This is really the final step when you install any new fuel injection system. Once the new chip comes back, I will have a perfectly tuned, perfectly running TPI 355 V8 in my Jeep that is great for the low end torque I need when rock crawling, but responsive enough to rip open when I need the wheelspin to conquer a trail. I will add more pictures and any other tech information I can think of once the rest of the parts are installed, and of course I will add some photos and hopefully short video clips of the Jeep in action after all is said and done. Danny,
3.21.06
|
CURRENTLY UNDER
CONSTRUCTION,
KEEP CHECKING BACK! 3.21.06


Here are some very useful TPI links for more information on this swap.
GM
Parts Direct, a great site for factory parts like PROM chips
Street and Performance in Mena, Arkansas, they have everything you need
Classic Trucks Magazine article on TPI swaps, Common Questions
Thirdgen.Org, a website devoted to the
third generation Camaro, Firebird, and Trans Am
TPI ECM (computer) interchange list on Thirdgen.org's website
Moates.net for all of your programming and
tuning parts
Scott
Hansen's TPI programming service
Copyright: Danny
Gaston, 2001-2007
Last updated: February 09, 2007